Save The Model
Save the Model loacly
You can easily save the model to your PC using WinSCP.
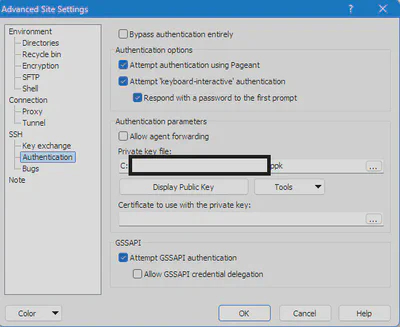
To do this, configure your private key (.ppk) in WinSCP.
When creating a new connection, go to the Advanced tab, then navigate to SSH -> Authentication, and add your private key.
Upload to Hugginface 🤗
1️⃣ Create an Account
First, create an account on Hugging Face.
Crearing a model
Next, create a model by visiting this link.
After creation, your model link should look like this:
https://huggingface.co/[YOUR-USERNAME]/[YOUR-MODEL]
3️⃣ Sign in to Hugging Face on the Server
First, generate an Access Token on Hugging Face:
Go to Account Settings -> Access Tokens -> New Token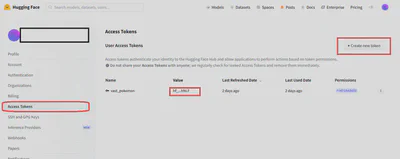
⚠️ IMPORTANT: Ensure the token has all necessary permissions; otherwise, you won’t be able to upload, read, or write data from the server.
Now, install the required library on your server:
pip install huggingface_hub
huggingface-cli login
Then, authenticate using your Hugging Face token. Once done, your Hugging Face setup is complete.
4️⃣ Uploda your model
Now, run this Python script on your server to upload the model:
from huggingface_hub import HfApi
import os

repo_id = "your-username/your-model-name"  # Change this to your HF repo
lora_weights_path = "/fn/finetune_lora/pokemon/lora_weights"  # Path to saved LoRA weights

# Initialize Hugging Face API
api = HfApi()

# Upload files to Hugging Face
api.upload_folder(
    folder_path=lora_weights_path,
    repo_id=repo_id,
    repo_type="model"
)

print(f"LoRA model uploaded to: https://huggingface.co/{repo_id}")
After uploading, visit your model page in a browser to confirm the transfer. This may take time depending on the file size.
Ensure
lora_weights_pathpoints to your latest checkpoint directorySet
repo_idto match your Hugging Face account and model.face account.
Test the model
Once uploaded successfully, test your model using this Python script:
from diffusers import StableDiffusionPipeline
import matplotlib.pyplot as plt

# Load base model and LoRA weights
base_model = "runwayml/stable-diffusion-v1-5"
repo_id = "your-username/your-model-name"

pipeline = StableDiffusionPipeline.from_pretrained(base_model)
pipeline.load_lora_weights(repo_id, adapter_name="pokemon_lora")

# Move to GPU
pipeline.to("cuda")

# Generate an image
image = pipeline("YOUR PROMPT").images[0]

# Display the image using matplotlib
plt.imshow(image)
plt.axis('off')  # Hide the axis
plt.show()

# Save the image to a file
image.save("generated_PROMPT.png")
print("Image saved as 'generated_PROMPT.png'")
The generated image will be saved on the server, and you can download it easily.