First Step
Before We Begin
Preparing Our Tools
Before starting, we need to prepare the necessary tools for fine-tuning Stable Diffusion with LoRA.
References
Here are some useful resources to guide us through the process:
- Fine-Tuning Stable Diffusion with LoRA (Webpage)
- Fine-Tune Stable Diffusion with LoRA for as Low as $1 (Video)
- Pokémon Dataset (Dataset)
- Diffusers GitHub Repository (GitHub)
- How to Fine-Tune with LoRA by Hugging Face (Documentation)
Required Tools
To set up our working environment, we need the following tools:
- A GPU server - To run our code. In this guide, we use vast.ai.
- PuTTY - To connect to the server via SSH.
- WinSCP - For easy file transfer between the server and local PC.
- A Hugging Face account.
- Python 3 - Ensure Python 3 is installed on your system.
Connecting to the Server
Logging into the Server
- Go to https://cloud.vast.ai.
- Register and ensure your account has sufficient credit.
Creating an SSH Connection
Install PuTTY as mentioned above. (Ubuntu and macOS users can use the terminal instead. Windows users can also use PowerShell, but PuTTY is recommended.)
Watch the video below to learn how to create an SSH key using PuTTYgen:

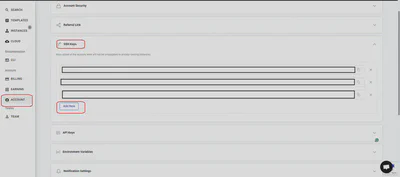
After generating your SSH key, add the public key to your Vast.ai account as shown below:
Selecting a Server
Once logged into Vast.ai, you will see an environment similar to the following:
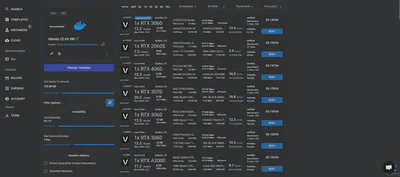
- Choose a Template:
- It is recommended to select Ubuntu 22.04.
- Alternatively, choose another OS if needed.
- Choose a GPU:
- For training and testing, NVIDIA RTX Series GPUs are recommended.
- Good options include RTX 3060, RTX 3070, and RTX 3090, depending on your computational requirements.
- Select Server Type:
- On-demand servers are recommended since interruptible servers may be disconnected unexpectedly.
- After selecting your server, click RENT to proceed.
- You will be redirected to a page that looks like the following.
](/media/vast-server_hu5628953902914957005.webp)
- You should navigate to
INSTANCESsection - Age of the server
- Connecting information will be available after loading. Such as
IP addressandport